How to containerize php apps using docker
Why docker containers ?
Containers are standardized unit of software. They help us to run our apps in a isolated environment in our operating system. They use three feature of linux operating system namely chroot,namespaces and cgroups. I suggest you read Brian holt's complete intro to containers for more info on how these technologies work internally. Docker is a container management tool with many uses like setting up a development environment, elastic scaling by kubernetes , bootstrapping a production server from a dockerfile and many more. We will be using docker containers for setting up a server for our php app randomBlog.
This post assumes that you have a intermediate knowledge about docker.
Our app
We will be a making an app that shows a random blog every time. You can see the source code here. We will be also adding features like continuous development using github and webhooks and a maintenance mode to our app.

App dependencies and tools
Our app will use the following dependencies and tools inside our docker container.
- Apache - web server that executes php script and returns output to http client.
- mysql - database to store blogs.
- phpmyadmin - database management tool with GUI.
- composer - package manager for php.
- dotenv - php package to load environment variables.
- git - version control system for continuous development.
- webhooks - server for listening to incoming webhooks for continuous development.
- go - interpreter for running webhooks.
- dockerize - docker container package for waiting for mysql db to start before our app starts.
- curl - for downloading composer.
- wget - for downloading go.
- php-mysql - php module for interacting with mysql database.
- libapache2-mod-php - php module for interacting with apache web server.
- php-curl - php module for making requests to other servers.
Directory structure
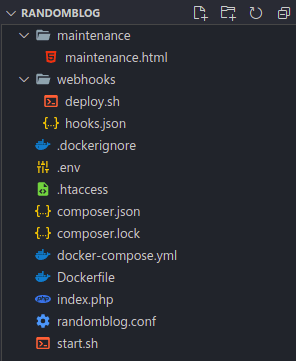
We will be using the following directory structure.
index.php
This is our main app file. when we go to index route of our app ('/') this file will be served by apache. All this php script does is create a connection to the database, get a random blog post from posts table using pdo and renders it in an html template.
1<?phpCopy23 use Dotenv\Dotenv;45 include 'vendor/autoload.php';67 // load env variables to $_ENV superglobal8 $dotenv = \Dotenv\Dotenv::createImmutable(__DIR__);9 $dotenv->load();1011 $host = $_ENV['DB_HOST'];12 $user = $_ENV['DB_USER'];13 $password = $_ENV['DB_PASSWORD'];14 $dbname = $_ENV['DB_NAME'];1516 // Create dsn - data source name17 $dsn = "mysql:host=$host;dbname=$dbname";1819 // Create a pdo object20 $pdo = new PDO($dsn, $user, $password);2122 // PDO query23 $stmt = $pdo->query('SELECT * FROM posts ORDER BY rand() limit 1');2425 // fetch blog post as object26 $post = $stmt->fetch(PDO::FETCH_ASSOC);2728?>2930<!DOCTYPE html>31<html lang="en">3233<head>34 <meta charset="UTF-8">35 <meta http-equiv="X-UA-Compatible" content="IE=edge">36 <meta name="viewport" content="width=device-width, initial-scale=1.0">37 <title>randomBlog</title>38</head>3940<body>41 <div style="margin:auto"></div>42 <h1><?=$post['title']?></h1>43 <p><?=$post['body']?></p>44</body>4546</html>
We are using dotenv package for pulling database credentials such as username and password from an
.env file. Every variable environment will be populated to the $_ENV super global. Contraire to usual practices, we are not putting .env file to our gitignore file because we are putting our app in the server by pulling from github. So we need that .env file
inside our github repo. Also make sure to make the github repo private.
1DB_NAME="randomBlog"Copy2DB_HOST="mysql" # mysql is the name of our mysql database container, docker will automatically resolve the host name.3DB_USER="alvin"4DB_PASSWORD="alvin123"
docker-compose.yml
This is the file where we define all of our container's info such as ports,networks etc. We will be pulling official images of mysql and phpmyadmin from docker hub.
1version: '3'Copy23services:4 randomBlog:5 container_name: randomblog # name of our container6 image: randomblog7 build:8 context: . # where to look for dockerfile9 dockerfile: Dockerfile # filename of dockerfile10 ports:11 - "80:80" # we will be binding port 80 on host to port 80 on our app container12 - "9000:9000" # for webhooks13 depends_on:14 - mysql1516 mysql:17 container_name: mysql18 image: mysql19 command: --default-authentication-plugin=mysql_native_password20 environment:21 MYSQL_ROOT_PASSWORD: root # root mysql password22 MYSQL_DATABASE: randomBlog # app database23 MYSQL_USER: alvin # database user24 MYSQL_PASSWORD: alvin123 # database password2526 phpmyadmin:27 container_name: phpmyadmin28 image: phpmyadmin/phpmyadmin29 environment:30 PMA_HOST: mysql # database host name to connect to31 PMA_PORT: 330632 ports:33 - "8899:80" # bind port 8899 on host to 80 on container so we can access phpmyadmin on port 8899 on host34 depends_on:35 - mysql
if you already running an apache or nginx server in your host system, run
sudo service nginx stoporsudo service apache2 stopto stop those servers. otherwise you will get an address already in use error from docker when you rundocker-compose up. You can also change host port address to 8000 or something like that in docker-compose file just for development.
dockerfile
This is the file with which we will build our main randomBlog app.
1# specifying base image as latest version of ubuntuCopy2FROM ubuntu:latest34# setting timezone in an environment variable named TZ , this will be used by tzdata (an ubuntu package) for setting timezone5ENV TZ=Asia/Kolkata67# writing TZ into etc/localtime and etc/timezone8RUN ln -snf /usr/share/zoneinfo/$TZ /etc/localtime && echo $TZ > /etc/timezone910# upgrading our packages and installing required tools and dependencies from apt11RUN apt-get update && apt-get upgrade -y \12 && apt-get install git -y\13 && apt-get install curl -y\14 && apt-get install zip unzip -y\15 && apt-get install wget -y\16 && apt-get install apache2 -y\17 && apt-get install php libapache2-mod-php php-mysql php-curl -y1819# downloading composer20RUN curl -sS https://getcomposer.org/installer | php -- --install-dir=/usr/local/bin --filename=composer2122# setting which version of dockerize to install in an env variable23ENV DOCKERIZE_VERSION v0.6.12425# downloading and installing dockerize26RUN wget https://github.com/jwilder/dockerize/releases/download/$DOCKERIZE_VERSION/dockerize-linux-amd64-$DOCKERIZE_VERSION.tar.gz \27 && tar -C /usr/local/bin -xzvf dockerize-linux-amd64-$DOCKERIZE_VERSION.tar.gz \28 && rm dockerize-linux-amd64-$DOCKERIZE_VERSION.tar.gz2930# downloading go31RUN wget https://dl.google.com/go/go1.16.linux-amd64.tar.gz3233# extracting go34RUN tar -C /usr/local -xzf go1.16.linux-amd64.tar.gz3536# installing go and installing webhook package from github37RUN export PATH=$PATH:/usr/local/go/bin && go get github.com/adnanh/webhook3839# copying apache configuration file40COPY ./randomblog.conf /etc/apache2/sites-available/4142# setting ServerName variable in apache config43RUN echo "ServerName randomblog" >> /etc/apache2/apache2.conf4445# making root directory of our app46RUN mkdir /var/www/randomblog4748# enabling rewrite engine in apache49RUN a2enmod rewrite5051# enabling our app52RUN a2ensite randomblog5354# removing default apache site55RUN a2dissite 000-default5657# checking for syntax errors in our apache configurations58RUN apache2ctl configtest5960# restarting apache to apply our changes61RUN service apache2 restart6263# change working directory to our app directory64WORKDIR /var/www/randomblog6566# copy our app files to our containers app folder67COPY . .6869# giving ownership to apache70RUN chown -R www-data:www-data /var/www/randomblog7172# make start script executable73RUN chmod +x start.sh7475# make deploy script executable76RUN chmod +x ./webhooks/deploy.sh7778# making dockerize wait for mysql container to be up79CMD dockerize -wait tcp://mysql:3306 -timeout 3000s ./start.sh
Some points to note :
- we are setting timezone in line 5 and 8 manually because else we will get a prompt asking to choose one from a menu and even if we select one, the prompt will be stuck causing the container build process to be stalled.
start.sh
This is the file that acts as a entry point to our app container. dockerize will run this script after mysql container is up.
This file does three things :
- updates and installs composer packages.
- starts apache server in the background.
- starts webhook server.
1#!/bin/bashCopy23composer update &&4composer install &&5service apache2 start &&6/root/go/bin/webhook -hooks /var/www/randomblog/webhooks/hooks.json -verbose
randomBlog.conf
This is a simple apache configuration file. You can add more features like gzip compression, and url aliases etc. For now this configuration file is enough.
1<VirtualHost *:80>Copy2 ServerName randomblog3 ServerAlias www.randomblog4 ServerAdmin webmaster@localhost5 DocumentRoot /var/www/randomblog6 ErrorLog ${APACHE_LOG_DIR}/error.log7 CustomLog ${APACHE_LOG_DIR}/access.log combined89 <Directory "/var/www/randomblog">10 AllowOverride All11 </Directory>1213</VirtualHost>
.htaccess
This is also a apache configuration file which can be included on a per folder basis. We are using this config file for adding a maintenance mode to our app when it is updating as a part of continuous development. This config file just checks for a maintenance.html file in our root app folder and if there is such a file, all request will be forwarded to that file which shows that our server is currently under maintenance. more on that below on continuous development section. Additional features like url rewriting and gzip compression can also be specified here.
1RewriteEngine OnCopy23RewriteCond %{DOCUMENT_ROOT}/maintenance.html -f4RewriteCond %{REQUEST_URI} !/maintenance.html5RewriteRule .* /maintenance.html [END]
Continuous development using github and webhooks
When we start our main app container a webhook server is listening on port 9000.
So our CD lifecycle includes the following steps :
- Push updated code to github repo.
- Github sends a webhook request to our server with a secret that only our server and github knows.
- We run a script on our server that will create a maintenance.html file on our root folder.
- Since there is a maintenance.html file , apache will redirect all requests to maintenance.html as per our
.htaccessconfig. - During this time our server will pull latest changes from github and after it finishes pulling, removes maintenance.html
- Since there is no maintenance.html now, requests will be handled by index.php
Setting up webhooks on github
For setting up webhooks on github goto settings -> Webhooks -> Add webhook
Then enter webhook url and secret. In our setup the hooks are listening on port 9000 on route /hooks/randomBlog
hooks.json
This is the file where we specify our webhook configurations like secret, endpoint etc.
- id : name of our app, hooks will be served on /hooks/id.
- execute-command : shell script to execute when hooks are called.
- command-working-directory : directory in which the script is to be run.
- response-message : just a message to display on cli when scripts are being executed.
- trigger-rule.match.type : encryption standard to use.
- trigger-rule.match.secret : webhook secret, this secret is also provided to github.
- trigger-rule.match.parameter.source : where to look for signature
- trigger-rule.match.parameter.name : name of header to look for signature, github puts its signature in
X-Hub-Signature-256
refer here for more configuration options.
1[Copy2 {3 "id": "randomBlog",4 "execute-command": "/var/www/randomblog/webhooks/deploy.sh",5 "command-working-directory": "/var/www/randomblog",6 "response-message": "Executing deploy script...",7 "trigger-rule": {8 "match": {9 "type": "payload-hmac-sha256",10 "secret": "randomblog",11 "parameter": {12 "source": "header",13 "name": "X-Hub-Signature-256"14 }15 }16 }17 }18]
maintenance.html
This is the html view that will be shown in the browser when the server is being updated. I have only used a basic html page here for simplicity. You can add css styles and be creative with it.
add
<meta http-equiv="refresh" content="30">meta tag to automatically refresh the page every 30 seconds.
1<!DOCTYPE html>Copy2<html lang="en">34<head>5 <meta charset="UTF-8">6 <meta http-equiv="refresh" content="30">7 <meta http-equiv="X-UA-Compatible" content="IE=edge">8 <meta name="viewport" content="width=device-width, initial-scale=1.0">9 <title>Site under maintenance</title>10</head>1112<body>13 <h1>Site is under maintenance</h1>14 <p>Server is currently updating, please leave this tab open to automatically retry after sometime.</p>15</body>16</html>
deploy.sh
This is a shell script that handles maintenance mode. It is run by our webhook server. It basically does three things:
- copies and places maintenance.html from maintenance folder into root folder.
- pulls updated app from github.
- updates and installs composer packages.
- finally removes maintenance.html file
1#!/bin/bashCopy2cp ./maintenance/maintenance.html maintenance.html &&3git pull origin master &&4composer update && composer install &&5rm maintenance.html &&6echo "app updated successfully"
Testing hooks locally
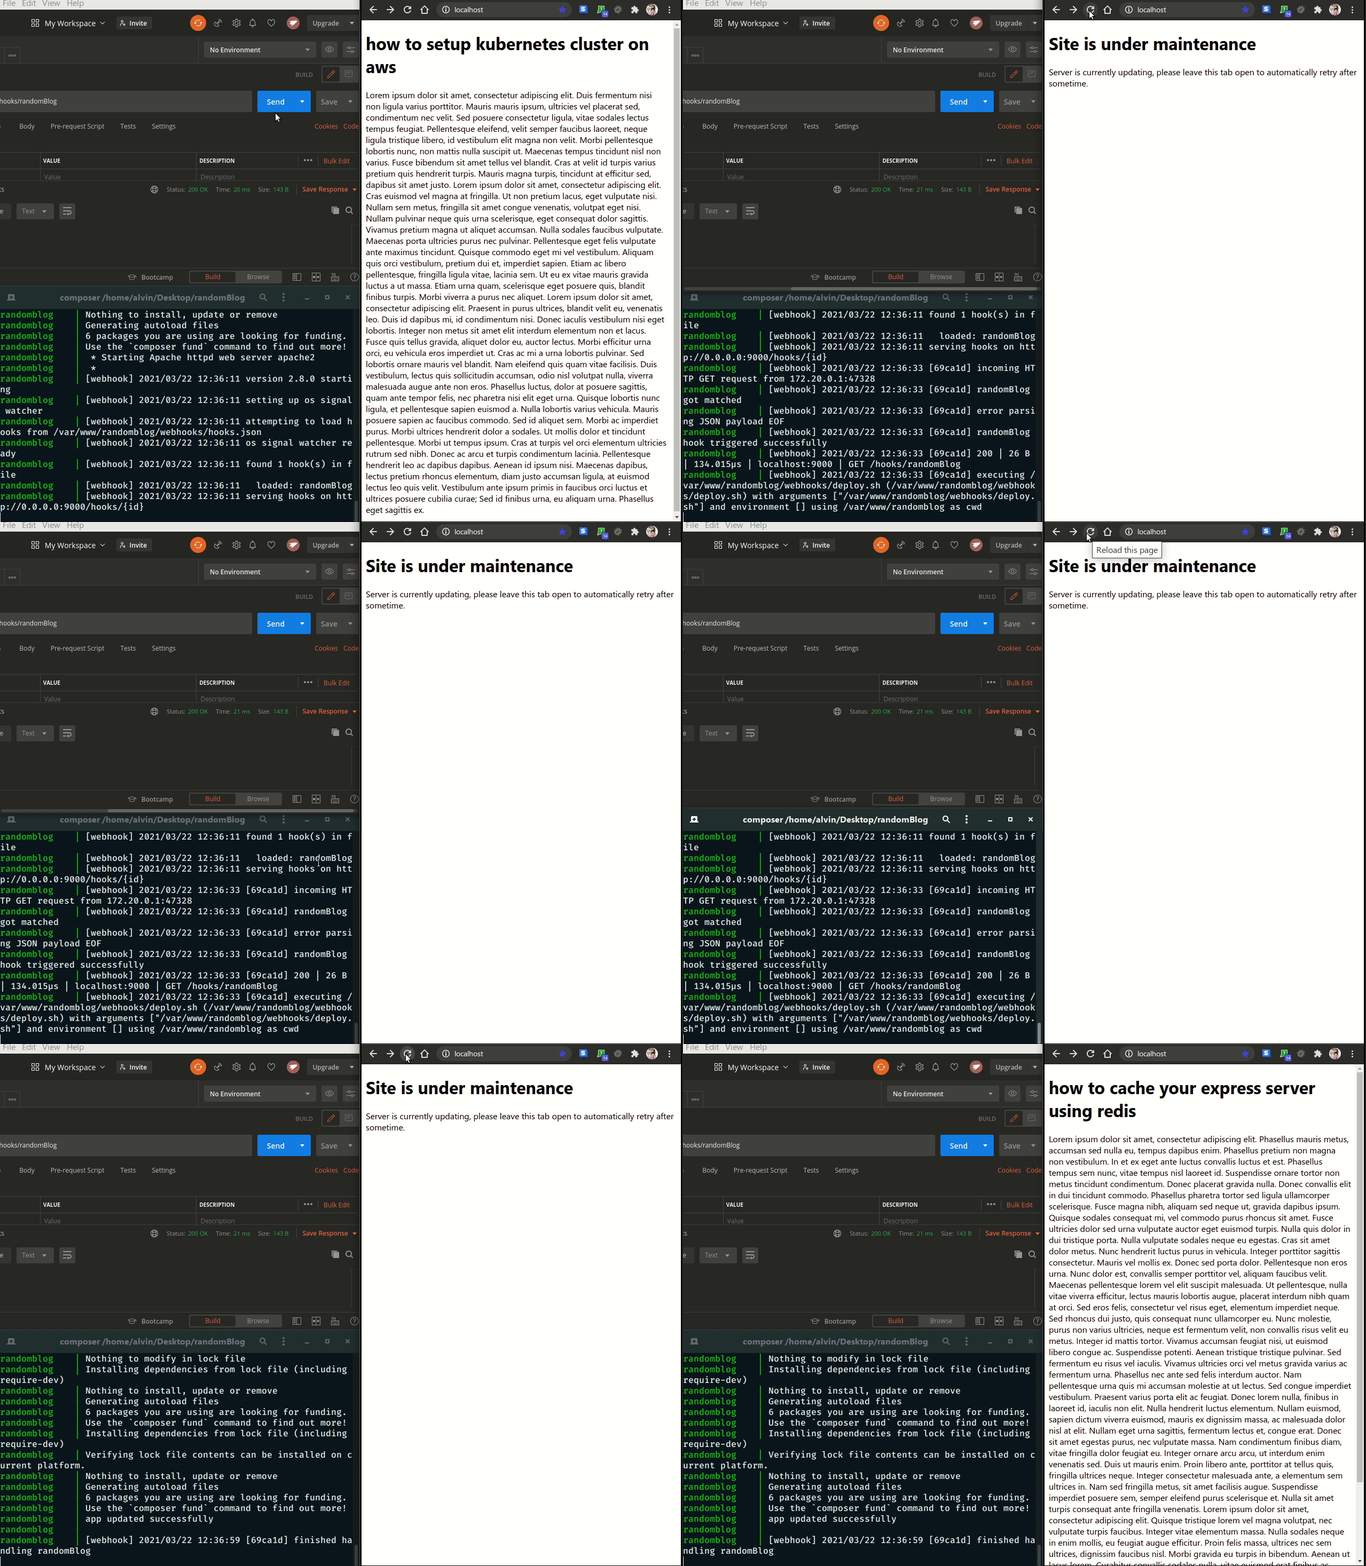
We can test our web hooks locally by removing security rules from hooks.json
and using an api testing tool like postman. I have added an additional image file
to the repo so that we have something to pull and we can observe the site going to maintenance mode.
1[Copy2 {3 "id": "randomBlog",4 "execute-command": "/var/www/randomblog/webhooks/deploy.sh",5 "command-working-directory": "/var/www/randomblog",6 "response-message": "Executing deploy script..."7 }8]
run
composer run-script startordocker-compose up --buildto start the server

Security note
We are running phpmyadmin on port 8899 of host system. Even though our database is protected using username and password.I suggest you refer this stackoverflow thread to learn more about protecting phpmyadmin.
Next steps
The next most important thing that you can add to your site is an sls certificate and enabling https. You can do it for free using letsencrypt.


